
Over the years I’ve learned that every photographer has their own workflow. Some are different..some the same and it’s based on your own personal preference. I’ve tried a couple different methods but here’s what I found works best for me. Is it right? No. Is it wrong? Nope. It’s just what I prefer. Here’s a step by step process of how I incorporate Lightroom and PhotoMechanic when photographing a sporting event.
Pre-game:
-
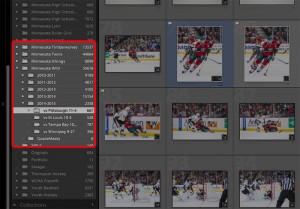
fig. 1
I’ll make a folder on my desktop for the game I’m photographing. In this case I’ll use the last game I worked (Pittsburgh Penguins vs the Minnesota Wild) and I’ll call it “vs Pittsburgh 11-4” (fig. 1). Why? It’s just the way I have my Lightroom catalog set up (I break my folders down by sport, then year, then by opponent).
- Minnesota Wild
- 2014-2015
- vs Pittsburgh 11-4
- 2014-2015
- Minnesota Wild
- Next, I’ll download my .xmp file provided by the agency I’m shooting for and save it into that folder. Then I’ll make the necessary changes to the Stationary Pad in PhotoMechanic which is usually just making a generic caption that I will apply to all the images. Speed will be important when it comes to captioning and uploading the files during and after a game.

I make my team code replacement files for PhotoMechanic. You can use the http://www.codereplacements.com/ website and pay for the service but I’m cheap and I don’t find it hard to do it yourself. This is probably a separate blog post but it’s a combination of the team data from ESPN, then using Excel and Word to create the text files. Unless it’s the first game of the season, the home team is already done so it’s really just making one for the visiting team and it takes me about 5-10 minutes. I’ll then load the code replacement files into PhotoMechanic. It usually consists of 3 different text files:
- Home Team
- Visiting team
- Hockey terms (I’ll use short code for terms like celebrates, shoots, passes, skates with the puck, congratulates (cel, sh, pa, swp, etc..). It just saves me time when I caption and it’s something that I’ll use every game.
That’s it for pre-game. Let’s go eat!
During the game
For hockey, you shoot the entire period, then run back to the photo editing room during intermission and work as fast as you can. This is 18 minutes which sounds like a lot, but it flies by and there’s a lot to do.
-
 I import all my photos through Lightroom with a USB 3.0 card reader for the fastest transfer speed. Why Lightroom vs PhotoMechanic first? I like to apply a global develop setting to the entire card when I import it. I know my lighting is consistent so I can apply the same develop settings to every picture. In this case it’s at Xcel Energy Center and I already have a preset made (MN Wild 1250/1250/2.8). Within that preset I have a number of corrections I apply so I’d rather apply them all at once in the beginning vs individually later. Here’s why:
- I know what camera settings I’ll be shooting at in manual mode. 1250 shutter, 1250 ISO, at f/2.8
- I shoot in large RAW format so it’ll adjust my white balance on import. I find this the biggest advantage in photographing in RAW. I’ll adjust WB to whatever temperature I need instead of using a warmer/colder on a .jpeg.
- *Side Note*: Some people shoot RAW + jpeg and make their edits on the jpeg thinking importing the RAW files will take too long and they’re too big. I’ve never had an issue in regards to speed. Maybe it’s my computer, card reader..who knows but I don’t have an issue with it.
- *2nd Side Note*: The first time I switched over to RAW I was scared that it was going to be different when I processed photos. When I open a RAW file or a jpeg in Lightroom they’ll function exactly the same. There’s no compression in the RAW file and you can have more editing capabilities, so there’s no reason not to. Go ahead, make the switch, you’ll be glad you did.
- As its importing I go through the entire period of images. This is the biggest drawback to using Lightroom vs PhotoMechanic. PhotoMechanic is a zillion times faster at rendering the image and it’s much faster to go through and select the images you want. Lightroom takes its time rendering and you’ll get the spinning “loading” symbol at the bottom. If I ever change my workflow, this will be the reason. I’ll go through all the images and flag them using the “p” key (pick). If I screw up, I’ll unflag them with “u” key. An entire period is usually between 150-250 images. Between whistles I’ll delete images that I know I’ll never use, or they’re blurry, or they’re just plan shitty so I limit how many I import between periods.
- Once I’ve flagged all the images I like (including stock for later), I’ll turn on the library filter so it shows me just the flagged images or my keepers. From the “grid view” I’ll select a few game relevant images that I need to transmit, usually between 4-8 and give them a color. 1st period = red, 2nd period = yellow, 3rd and final images = green. Why these colors? It’s just the order in Lightroom so it helps me keep track of what I’ve sent and I don’t resend the same image after the game.
- I’ll then sort the flagged images by “label color” so the “red” images show up first and enter the “develop” mode.
- Within develop mode all I really need to do is crop since all the images had the “MN Wild preset” applied to them. On occasion you’ll have some minor tweaking if it’s in a dark spot in the arena.
- Once the cropping is done, I’ll export the files to the desktop in a separate folder and call it “USA1” so I know it’s my first set of transmitted images (next period is USA2). On export you’ll set up:
- Folder location
- Renaming (if you need to)
- File size limitations
- Resolution
-

fig. 3
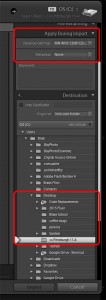
Then I go into PhotoMechanic and hit refresh and my newly editing folder USA1 will appear. Open it, select all, and then apply stationary pad to all the images. Now every image has the generic caption for all the images and I just need to fill in the “XXXXXX” for each image using the code replacement files (home, away, and hockey terms) that are already loaded. (fig. 3)
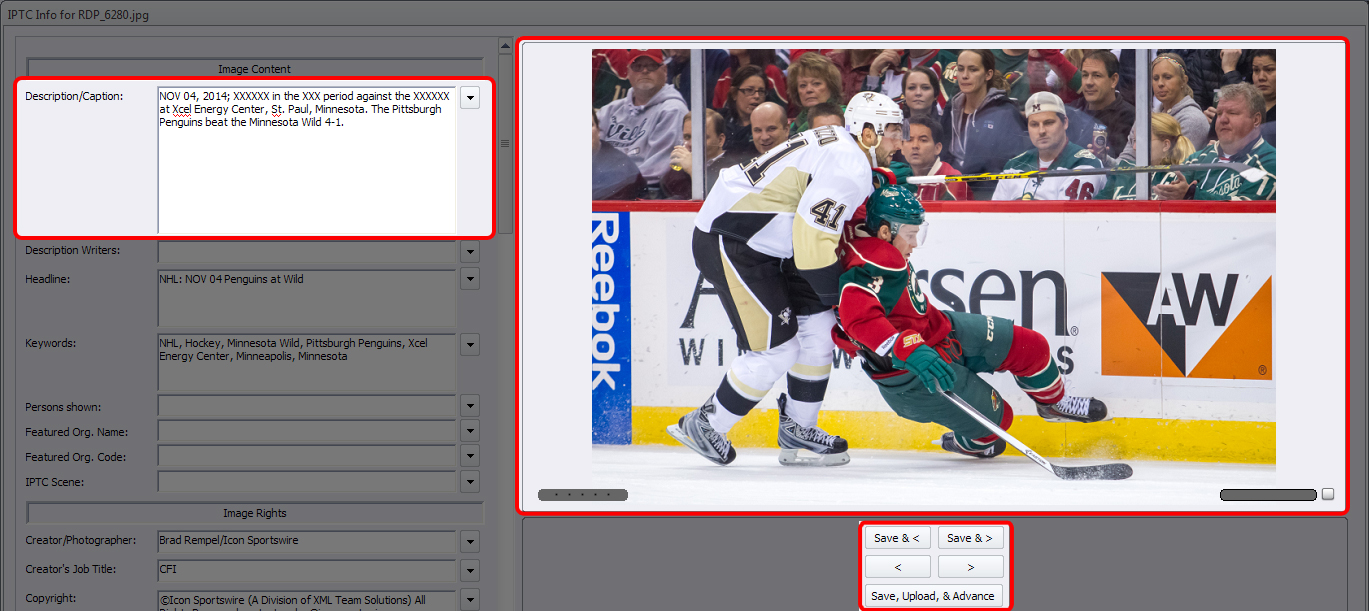
- In figure 4, you’ll see how PhotoMechanics code replacement works:
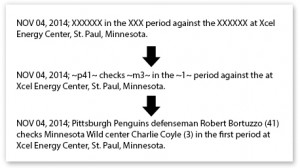
fig. 4
- Then I click “Save, Upload, Advance” and caption the next image until I’ve done all the selected images for that period (fig. 4). The FTP servers are already set up to go to the appropriate agencies. *knock on wood* – I’ve only screwed up once sending a couple files to the wrong agency. Whoops, forgot who I was shooting for that night.


Now hopefully this was all done in 18 minutes so I can run out to the next location for the next period. On occasion you don’t quite get it done in 18 and you’ll miss the start of the next period. Oh well, all you can do is try.
Post-Game
The only thing slightly different in the post-game transmission is I’ll look through all 3 periods flagged photos and find other pictures that may have been game relevant that occurred during the 1st and 2nd periods. Things like stock photos of goal scorers or other photos that were good but didn’t have the time to send. Since I’ve “colored” the photos by period, I know which ones I’ve sent already.
My PhotoMechanic by default is set to organize the pictures by capture time. This will also help when figuring out what period the action happened.
I’ve also got more time so I can relax a little. In the end I’m hoping to send about 30-35 end of game images and the others that I flagged will go to the stock folders another day.
VERY IMPORTANT: If you export your folders into separate sub-folders (like described), after you’re done shooting you’ll have to copy all the saved images with captions back into Lightroom.
So from Photomechanic:
- Select all
- Save photos as (select the main folder: vs Pittsburgh 11-4
Then in Lightroom right click on the folder and “synchronize the folder”. It’ll then import all the new jpegs you just captioned and transmitted and all the metadata in the caption field. So now if I need to find any Charlie Coyle pictures, my library is up to date. *Side note* – If your images look all out of whack, it’s because you’ve applied the “MNWild” import settings again on the already corrected jpegs. Just select all, right click, develop settings, and “reset”.
It sounds like a lot and it is. You’ll eventually get into your own rhythm and it’ll seem like a snap in no time.